IaaS allows you to host full virtual machines in the Azure cloud. (Among other things) Pre-configured options currently include Windows (2012, 2008r2) and Linux. (CentOS, Ubuntu, Suse)
 |
| VM Management Dashboard |
In this article, I'll walk you through signing up for Windows Azure, provisioning a basic 2012 server, and installing and configuring a serving platform.
Sign up
Navigate to http://www.windowsazure.com/en-us/pricing/free-trial/ and click "Try it now". You'll need to logon with your Microsoft (Live/Passport/etc.) and enter your credit card information to start an account. Note that after the 90 days you will need to cancel the account or you will be billed for anything you have setup.
Setup
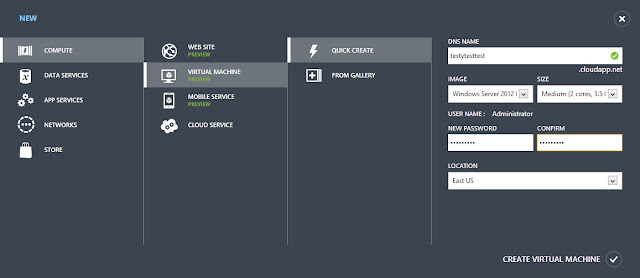
After account setup you should be able to immediately log into the Azure management portal. After logging in (and browsing around; they've really done a nice job on this) click "New" in the bottom lefthand corner. To create the 2012 instance, select "Compute->Virtual Machine->Quick Create". You will then need to populate the following fields:
- DNS Name: This is both the name of the machine and where it will be accessible on the internet. The cloudapp.net suffix will be added on the end of the name. Say, for example, you name it "megawidgetgenerator01". In that case you can find it on the internet by resolving "megawidgetgenerator01.cloudapp.net". Your name will need to be unique among other machines in that DNS zone. (see the green checkbox)
- Image: What you want the VM to be. I'll be selecting "Windows Server 2012 Datacenter"
- Size: This select how many cpus and how much memory you would like. After the trial (and perhaps during depending on usage) you will be charged relative to your resource utilization. "Larger" machines cost more per month. I'll be going with "Medium" for my test, which gives me 2 dedicated cores and 3.5GB of RAM. The processors used (as of the writing of this article) are the AMD Opteron 4171 HE, not a stellar performer but excellent in the cores-per-watt department which makes it a smart choice.
- UserName: Fixed at this time to "Administrator"
- Password: for the admin account. Pick something good; this is accessible from anywhere.
- Location: Which datacenter do you want it in? Pick the geo closest to your users.
After filling that out, click "Create Virtual Machine". Your new VM will be provisioned within a few minutes. You can now connect to your new server by navigating in the Azure management portal to Virtual Machines->Select your new VM-> Connect (on the bottom). This will send you a .rdp file to connect via RDP, but know you can just connect to the hostname you selected at any time; RDP is automatically enabled and unblocked by the default image.
Configuration
After connecting, you probably want to run Windows Update to ensure everything is patched up. After that, do the following:
- Install your application. (Mumble in my case)
- Unblock the ports in Windows Firewall
- Set the ports up as Endpoints in Azure EDIT: See my article here.
Windows Azure defeats the IPv4 exhaustion issue by NATing VMs. (boy IPv6 will be nice) Because of this, you need to setup enpoints in Azure so they can update their NAT rules to forward ports on the public IP (visible when you click your VM and look under "quick glance") to the private IP associated with your machine. The current limit for endpoints is 150 ports. This should be more than enough for most applications. To accomplish this: refer to the following:
Overall I'm impressed. I'm very excited to work with Azure in the future. With these capabilities, I feel I've always got another datacenter on tap for any of my clients I can use for load balancing, DR, or as a primary site for whatever they may need.


No comments:
Post a Comment