Showing posts with label Server 2012. Show all posts

Tuesday, January 28, 2014

Cloud Authentication Primer: Basic Active Directory Federation Services Setup

Cloud computing. Cool stuff eh? Just pay your (not quite) local provider and all your problems are a thing of the past.

How are we going to authenticate/authorize our users? I dunno, but sign the contract now and you get a special price for a limited time!

Fortunately you're in luck. Microsoft released Active Directory Federation Services (ADFS) all the way back with 2003 r2 and released the much appreciated version 2.0 a bit after the release of 2008 r2 (install-able as an upgrade). Version 3.0 has just shipped with 2012 r2, and each release has brought many welcome new features.

Put (probably too) simply, ADFS allows you to extend your Active Directory space to other platforms, including Azure, Amazon EC2,  and other cloud services including those supporting SAML. By doing so, you can grant your already set up internal users access to new services located elsewhere. ADFS is also required for some Microsoft products including the new Web Application Proxy, which I'll be covering later. This isn't the only way to accomplish AD auth to other parties (AD Replica; IDaaS), but it's a great place to start.

The main components of ADFS are as follows:

  • Federation Service: This service on one to many servers facilitates the core functionality; sending/receiving authentication requests to/from third parties. 
  • Federation Service Proxy: Sits in a perimeter network (DMZ) and sends requests to Federation Service servers on the interior of your network on behalf of clients outside the interior. 
Highly simplified view of ADFS In Use; I'm guessing Bob is cool with that. 

With that primer set, let's walk through a basic install/test of a single instance of Active Directory Federation Services 3.0 on Windows 2012 r2. I will not be covering the proxy or services integration at this time.

Requirements


Other than domain admin rights as listed, you'll also need:
  • An Active Directory domain you would like to extend
  • 2012 r2 media and licensing taken care of. 
  • Domain Admin privileges; minor AD updates will be necessary and you'll need a new service account.
  • The ability to create new trusted certificates from either an internal or external source. (Need a new PKI setup? See my article here.)
  • At least one VM/Physical machine; One for the ADFS server and another as a shared database infrastructure if you desire. More on those options below. 
  • Desired server on the internal network and domain joined with access to Active Directory servers. 
  • Access to add records to DNS. (May not be required but I recommend it) 
  • (If applicable) Ability to create a new DB in a shared infrastructure. Note this is only a requirement if you do not intend to use the Windows Internal Database. 

Sizing


ADFS, like Active Directory and most related services, is not very demanding from a hardware perspective. A modestly sized VM is generally a good solution in most cases and scaling usually is realized horizontally, dictated by geographic concerns. You can use either the built in Windows Internal Database for ADFS or place the database on a shared infrastructure if desired. I will be using a shared DB infrastructure for this example. For more information on sizing, see this link. 

Step 1: Install ADFS Binaries

  1. Log on to the machine you would like to set up as an ADFS server with your administrative logon. 
  2. If not launched already, launch Server Manager and click Manage-> Add Roles and Features
  3. Click Next on the Before you begin page. 
  4. Select Role-based or feature-based installation and click Next.


  5. Select the appropriate server and click Next.


  6. Select the Active Directory Federation Services role and click Next. (Note that despite serving up some services via HTTPS IIS is not needed)


  7. No additional features will be needed; click Next.
  8. Read the ADFS notes and then click Next to proceed.


  9. Click Install to execute. When completed, do not configure ADFS yet.


Step 2 : Acquire Certificates 


For ADFS to function correctly you'll need at least one certificate. The certificates needed are for service communications and Token-signing. For the purpose of this tutorial I will not be replacing the auto-generated Token-signing certificate because the install will work fine without doing so. For a large scale, production installation, however, I highly recommend installing a custom Token-signing certificate after installation. For more information on how to do so, see this TechNet link.

As for the service communications certificate, this must be created to proceed. This can be either an internal PKI or third party cert so long as all clients intending to use ADFS trust the certificate. Obviously if you're working with a large third party (say salesforce.com) you'll need another third party's certificate (digicert for example). If you're working across your enterprise only, you can use your PKI but you will need to ensure all devices (mobile included for workplace join) trust your CA and your CRL needs to be accessible externally (see Publish Root CA CRL & CRT to Web) For the purposes of this example I'll be using the company PKI so expect specifics of certificate application to differ accordingly.

As for the certificate name you should pick the eventual external name of the ADFS service. Should you configure an ADFS proxy in the future, Microsoft instructions mandate the use of the same certificate. For this reason plan accordingly. Other SANs are necessary as well; we'll cover that below:


  1. Apply for a certificate; if using internal Microsoft AD PKI the web server template will work fine. 
  2. Set the common name to your desired external connection URL. For this example I'll be using fs.companyname.com
  3. Add the following DNS SANs (subject alternative names)
    1. fs.companyname.com (Yes, it's in the CN but needed here again to work properly)
    2. internalservername.internaldomain.lan (Unless you plan on splitting DNS internally) 
    3. enterpriseregistration.companyname.com (This is needed should you ever want to utilize Workplace Join and won't hurt you even if you don't) 


  4. Ensure the private key is marked as exportable as you'll need this cert for an ADFS Proxy in the likely event that you need it.


  5. Acquire the certificate and ensure it is installed correctly in the personal store of the local computer. 

Step 3: Configure ADFS


With your cert in hand we're ready to config ADFS. Be prepared to create a new service account for this step. 
  1. On Server Manager on the ADFS server, click the flag and then select Configure the federation server on this server.


  2. On the Welcome screen, select Create the first federation server in a federation server farm and click Next.


  3. For Connect to AD DS ensure you have the appropriate user selected. If it's the current user you won't need to change anything. Click Next


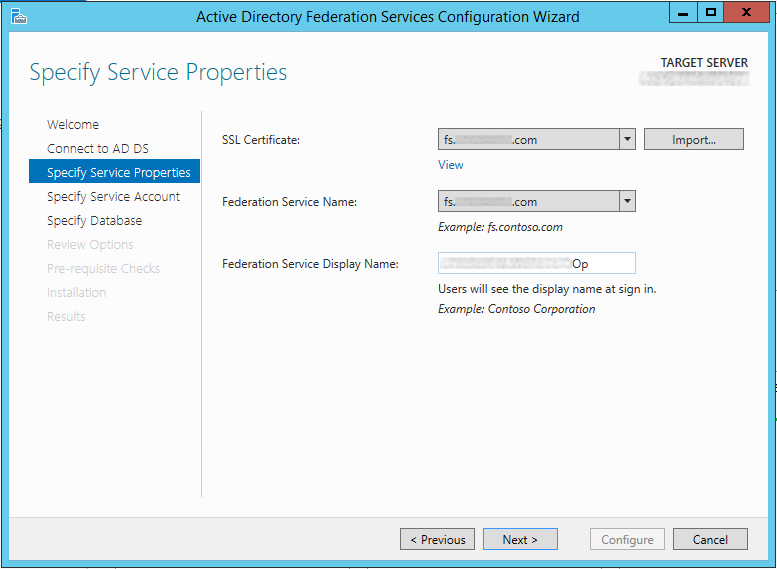
  4. On Specify Service Properties select the SSL certificate you imported earlier or import it now if you have yet to do so. 
  5. Ensure the Federation Service Name matches the external URL reference associated with the SSL certificate name. 
  6. Set the Federation Service Display Name to what you would like your users to see when using the service explicitly, i.e. "My Awesome Company". Click Next.


  7. As for the Service Account, I recommend using a Group Managed Service Account if your domain supports it (Windows 2012). If not, fall back to a Managed Service Account or standard Service Account. As I'll be using a managed service account we'll need to do the following; if not, substitute your own account creation needs for the sub steps below. 
    1. To facilitate the GMSAccount Open a Powershell prompt as administrator and execute Add-KdsRootKey -EffectiveTime (Get-Date).AddHours(-10)


    2. Close Powershell and return to the Wizard
  8. Select the appropriate service account type and specify a name. If using a GMSAccount the Wizard can create it for you. Be sure you give it a name that suits your standards (I use GS_ where G=Group,S=Service, _=meaningful) and click Next


  9. Select if you would like to use the Windows Internal Database or a SQL install/instance on a different server. In my example I'm using a dedicated SQL server. Click Next.


  10. On the Review Options page you will be presented with the information you have just entered. Ensure it is correct and click the View Script button. This is the Powershell equivalent for this installation; save it for later reference and perhaps use for another member in the farm. Click Next.


  11. The Pre-Requisite checks will run. Provided it passes, click Configure


Step 4: Configure Networking

  1. Add a DNS record to your internal network to point the public URL you specified in the SSL certificate to the internal address of the ADFS server. 
  2. If testing workplace join internally, add the appropriate enterprise registration DNS entry as well. 
  3. If you proceed further with an ADFS Proxy you will need to add an external DNS record at that time. 

Step 5: Test and Troubleshoot


After installation you can perform a simple test by navigating to:

https://fs.(companyname).com/adfs/ls/idpinitiatedsignon

Where the fs.(companyname).com represents the URL specified in the DNS SAN/CN of the cert. This should present you with the following logon screen: 

All you need do is click the Sign In button and you will receive a login prompt. If entered correctly and all is working you should get the message You are signed in. when completed. 


If you have any additional problems I can offer the following: 

  • The most interesting event logs are stored in Event Viewer->Applications and Services Logs->AD FS->Admin. 
  • If the configuration fails with a cryptic error message, ensure you don't have anything taking up port 80 or port 443. If either is taken the config routine crashes. 
  • If you need to re-do the installation for any reason that is fine, but make sure you overwrite the database. The easiest way to do so is use the powershell script we mentioned above, but add the -OverwriteConfiguration True parameter. 

In Closing

Clearly this is just the beginning. The next logical step would be to setup an ADFS Proxy and then establish relationships with your SaaS providers. We'll have more on that in the future. To get started now, check these thoroughly vetted and highly appreciated links, now with 86% less sand.

Edit: Dan Salmon from the good folks at RBA Consulting sent over this excellent Microsoft link that lists many SSO ready SaaS offerings. A great place to start if you're looking...

ADFS

WindowServer: ADFS Overview
TechNet: Planning for Federation Server Capacity
TechNet Security Forum: ADFS SSL Certificates
ADFS Product Support Blog: SSL, Token Signing, and Client Authentication Certs
MSDN Social: ADFS Token Cert - 3rd Party Cert Required?
TechNet: Certificate Requirements for Federation Services
TechNet: Token Signing Certificates
TechNet: Federated Web SSO Example
TechNet: Installing the ADFS Web Agent component of ADFS
Jeffrey Schwartz: ADFS 2.0 Open Doors to the Cloud
Example in Action: ServiceNow ADFS/SAML config

ADFS Proxy


Azure + AD


Misc


Thanks for reading!

Tuesday, May 28, 2013

Windows Server 2012 SuperFeature: DHCP App-Level Failover/Loadbalance

Foreward


One of my favorite additions to Windows Server for the 2012 version is application level load balancing and fail-over. This all new implementation does away with the previous solutions: "scope-splitting" and Windows clustering, neither of which I have ever felt comfortable recommending to a client. Splitting scopes doesn't do enough to prevent outages, and clustering is too complex to be a DHCP solution.

Fortunately, Microsoft recognized this gap in their product and released this new app level failover solution that aims to be as simple and straightforward as possible. I've deployed this a couple of times now and I'm blown away. Here's a high level overview of the implementation:

  • A single implementation can have two servers, no more. 
  • Servers can be configured in load-balancing or hot standby mode. 
  • Servers can reside across routing boundaries. (Enables unified management as well!)
  • Failover/Loadbalance Limited to IPv4
  • DHCP supported on server core
  • (Optional) Replication encryption 
  • Limit of one replication relationship type between two partners
And best of all,
  • Easy to set up and maintain.  (With a couple caveats I'll list below)

Hot Standby vs. Load Balancing


The hot standby option utilizes one DHCP server to service requests while the other waits to step in should the primary fail. A percentage (generally single digit) of the scope in question needs to be dedicated to the passive standby server for slack address space to allocate in a failover event where the backup hasn't yet asserted primary status. Microsoft states that hot standby is useful for multiple multi-site deployments wherein the primary would be onsite and a secondary would be located offsite should the primary fail. Here are a couple scenarios well suited to hot standby:

Multi-Site, Single Backup


Two sites backing each other up


The load balancing strategy splits client servicing based off of a MAC address hashing algorithm and will still respond to client requests that the other member in the pair should service in a situation where the client has gone unanswered. Provided you're using a datacenter licensing model and virtualization, most folks will want to utilize load balancing with two DHCP servers per site, generally on different hosts connected to different switches. If needed, load distribution mechanisms like F5s will work with this tech.

Two Sites Each Independently Load Balanced


Now let's set up DHCP failover or load balancing:


Assumptions


  • Basic knowledge re: Windows server 2012 and DHCP
  • Two 2012 servers ready to go and fully patched
Since we need to set up at least two servers, we'll do this twice, once with the GUI and once with Powershell.

DHCP Server Setup (GUI)


  1. Install the DHCP server role by using server manager and selecting Manage->Add Roles and Features


  2. After bypassing the intro screen, select "Role Based or Feature Based Installation" and select your server.


  3. Select the "DHCP Server" role. Admin tools will be auto-selected as needed. 


  4. Click "Next" through the rest of the Wizard. Once it completes, you'll be notified that DHCP configuration needs to be completed.


  5. Launch the DHCP Post-Install configuration wizard and complete the DHCP setup by authorizing the DHCP server. 


DHCP Server Setup (Powershell)

Where (Servername) is the FQDN of the server you wish to install, execute the following on a domain connected computer with proper rights on the target machine:
  1. Load the servermanager module:
    Import-Module Servermanager
  2. Install DHCP:
    install-windowsfeature -ComputerName servername.domain.lan -name dhcp -IncludeManagementTools
  3. When complete, authorize in AD:
    Add-DhcpServerInDC -DnsName servername.domainname.lan
Note that in step #3 you must specify the -ipaddress parameter (i.e. -ipaddress 10.0.0.10) if your server has either multiple NICs or has messed up registration in DNS. See here for more info.

Prep for Server Pairing


After authorization, the DHCP services need be restarted due to group add/creates. Do that or reboot the servers in question, whichever is easier. Set up your DHCP scopes as you normally would on one of the two servers. (More info, ignore the 80/20 part) 

Configure DHCP Server Pair (GUI)

  1. Open up the DHCP management GUI and right click on the scope you would like to load balance and select "Configure Failover..."


  2. On the "Introduction to DHCP Failover" screen, select all scopes you would like to configure (or "Select all" for all) and click "Next".


  3. On the "Specify the partner server to use for failover" screen select the other DHCP server. This can be looked up provided the server has been registered in Active Directory. 


  4. On the "Create a new failover relationship" page configure the following:
    1. Relationship name: Configure a name for this partnership; you may want to manipulate this via Powershell so take that into account when considering a very complex name. 
    2. Maximum Client Lead Time: This determines two three things: A) The lease time for a new client request if the server responsible for that client is down and the other answers the request and B) The amount of time one server will wait for a dead partner server before it takes control of the entire IP address block. C) (added 8/5/13) The amount of time one server that had been down must be available to the other before "Partner Down" status will automatically be changed to "Normal" status. (See comments for an example of this) The default of 1 hour is generally good but you may want to tweak depending on your setup. 
    3. Mode= Load Balance / Load Balance Percentage: This determines how much of the total load each server will take. 
    4. Mode= Hot Standby / Role of Partner Server/Addresses reserved for standby server: This determines if the partner sever is the primary or the standby and how much of each scope is reserved for distribution should the primary go down. Be careful that you have enough reserved here so that you won't run out of IP addresses prior to switching to "Partner Down" mode while also ensuring you won't run out of IPs on the primary server due to reserved addresses on the standby.
    5. State Switchover Interval: Selecting this enables either server to enter "Partner Down" state should communication be interrupted for the number of minutes specified after the option (default 60) resulting in the remaining server taking full responsibility for the scope(s). If this is not selected, an admin must manually choose to put the server into partner down state.
    6. Enable Message Authentication and Shared Secret: I highly recommend checking this box and specifying a long (14+ character) shared secret. This will encrypt messages between the two servers by using SHA-256. Should you wish to change the crypto, navigate to "HKEY_LOCAL_MACHINE\SYSTEM\CurrentControlSet\Services\DHCPServer\Parameters\" in the registry and add/change "FailoverCryptoAlgorithm".


  5. You'll then be met with a failover summary screen. Verify the info and click "Finish". 


  6. You will be shown the failover setup process. 


Configure DHCP Server Pair (Powershell) 


This time around you don't need to do configuration twice, so this section would be in lieu of the previous. Refer to the section above for full descriptions, I'll just do mappings here:

Load Balanced


Add-DhcpServerv4Failover [-Name] (String) [-ScopeId] (IPAddress[]) [-PartnerServer] (String) [-AutoStateTransition (Boolean)] [-ComputerName (String)] [-LoadBalancePercent (UInt32)] [-MaxClientLeadTime (TimeSpan)] [-SharedSecret (String)] [-StateSwitchInterval (TimeSpan)]


Where:

-Name = Name above
-ScopeID = The IP of the scope to be partnered
-PartnerServer = DHCP Server 2
-AutoStateTransition = "State Switchover Interval" above. Note that if the "StateSwitchInterval" argument is used in the powershell command then this value is assumed TRUE, otherwise the default is FALSE
-ComputerName = DHCP Server 1
-Load Balance Percent = The % to be serviced by DHCP Server 1
-Max Client Lead Time = Same as outlined in the GUI section
-SharedSecret = Same as outlined in the GUI section
-StateSwitchInterval = Int; specifies how long to wait until auto transition to Partner Down. Makes AutoStateTransition assumed to be true.

Failover


Add-DhcpServerv4Failover [-Name] (String) [-ScopeId] (IPAddress[]) [-PartnerServer] (String) [-AutoStateTransition (Boolean)] [-ComputerName (String)] [-MaxClientLeadTime (TimeSpan)] [-ReservePercent (UInt32)] [-ServerRole (String)] [-SharedSecret (String)] [-StateSwitchInterval (TimeSpan)]


Where:
-ReservePercent = Same as outlined in the GUI section
-ServerRole = Active or Standby

Important Usage Notes!


  • Server Options are NOT replicated! Take this into account when setting up replication; you may want to specify options at a scope level so that if they are changed you don't need to manually do it on each server. 


  • There have been some reports of replication breaking custom options. See here for more info. 
  • How do "Communication Interrupted" and "Partner Down" states get initiated and what effect do they have? Refer to this handy flowchart I whipped up for reference:  


References: 


MSFT DHCP Team Blog: Hot-Standby
MSFT DHCP Team Blog: Failover Load Balance
Technet: Step by Step Configure DHCP for Failover
MSFT Doco: Understand and Troubleshoot DHCP Failover in Win8 Beta (Still Relevant)

Closing


Thanks for taking the time to read; should you have any questions leave them in the comments!

Saturday, March 16, 2013

Do You Need Virtual Machine Manager and VMM 2012 SP1 Installation

Do I need VMM?


That's a question I've heard many times and while there is alot of data out there I wanted to make a simple list to help those entertaining the same question. Here is the breakdown of what Microsoft offers with VMM above and beyond standard Hyper-V:

  • Centralized management and configuration support for Hyper-V, Xen Server, and VMWare.
  • It contains P2V Migration tools not included with standard Hyper-V.
  • One console for managing multiple hosts. While using standard Hyper-V you can have multiple hosts in one MMC, but you need to switch between them. 
  • Automatic "workload placement" i.e. automatically moving a guest from one host to another based on load. 
  • Tools for environment consolidation. (Identify idle guests, etc.)
  • Much more from a management perspective including tools facilitating hosting multiple clients. "Tenants". 
If any of these features are appealing to your business you should give VMM a try. Everything you need for a trial is available for free. (Win8 AEK, VMM, SQL Express) For licensing costs, see this blog post by the always sharp Scott Lowe and this FAQ published by Microsoft. Now that we covered that,let's install!

Installing VMM


Assumptions

  • We're talking 2012 SP1 here, so you'll need Windows Server 2012 
  • Internet Access to D/L the Win8 AEK (link below)
  • Domain and preferably Enterprise Administrator access (You'll see why) 
  • This has a SQL Database; I assume you know where you want to put that. "An intern with Excel" will not suffice.  

Prerequisites

  1.  First you'll need to download and install the Windows 8 Assessment and Deployment Kit on the server on which you intend to install 2012. When installing select "Deployment Tools" and "Windows Preinstallation Environment" only. 
  2. Service Account: This domain-based service account will need only Administrative access to the target server. Lesser access is not possible per Microsoft. For additional security lock the account down to being able to log onto that server only. While it is possible to run VMM with a non-domain account, I won't cover that because doing so loses functionality. If you haven't done a service account before make sure you create at least one dedicated OU and a good prefix or suffix for the account name. I use a prefix of S_.
  3. A container for the Active Directory based crypto keys. By putting these in AD you facilitate moving the server or having a highly available environment. Again, I will not cover the "local" option. There is conflicting information on how to implement this, but through testing I determined that you DO need to pre-create the DKM container. This article is correct on the steps to configure, but here is a short list: 
    1. Pick a location in AD for this container. Use ADSIEdit to create the container by navigating to where you would like it and right clicking target OU->New->Object->Container and name it. (I recommend VMMDKM to correspond with MFST doco) 
    2. (If you're not an "Enterprise Admin", "Domain" not enough) Right click the new CN, select properties, and switch to the "Security" tab, and add the username of the installer to have full control to "this object and all descendant objects". Click OK. 
    3. Make sure you take note of the distinguishedName; this can be copied easily by right clicking->properties->double click distinguishedName->copy to clipboard/paste to notepad or Edlin or vi or Lotus WordPro or WordStar.

 Let's Do This


  1. Insert the DVD (image) and start setup.exe. Hit "Install".
  2. Check "VMM Management server" and "VMM Console" if desired and hit "Next"
  3. Enter your Name, Company, and ProductID. You can do a "evaluation" edition if you don't have a key yet. Hit next, accept the service agreement, and hit next again. 
  4. Choose if you want to participate in the CEIP, and hit "Next". 
  5. Select your install directory and hit "Next". As a rule of thumb I recommend using a drive other than the system drive for  all apps and logs.
  6. Assuming you pass the pre-req check, note any warnings and hit "Next". 
  7. Select your SQL server. As noted above your installer account will need to have sufficient permissions to add a database. If you're setting up a lab and don't have a "real" SQL server available, check out SQL Express. Enter the appropriate info and click "Next".
  8. Now you'll need to enter the service account that we discussed above. Check the "Store my keys in Active Directory" and copy in the DN from earlier. Hit "Next". If you want to use the non-AD based option you can, but eventually your server will self destruct.
  9. On the Port Configuration screen, accept the defaults unless you know you'll conflict with another service on the box and hit "Next".
  10. Specify a location for the VMM Library share. Again, I recommend not putting this on the system drive. Don't worry about space at this time, you can always change this after the install. 
  11. Hit "Install" on the Installation Summary screen. 
  12. Make sure you update the server & VMM from Windows Update and party like it's 1999. 
Now that you've got it installed it's time to see what it can do. I'm not going to tackle that today, but here are a few other resources to get you started:

Have fun & if you have any questions, let me know!

Update 3/31/2013: Troubleshooting
  • Host Performance Counters read 0!  I was having an issue where VMM was missing all or some of the performance counters. Fortunately Kristian Nese published a fix that works well here

Friday, February 15, 2013

Server 2012 Hyper-V + RDP + RemoteFX = a Delicious "Sangwich" of Cheap VDI

Oh man. Microsoft has done well on this; VDI/RDP/HyperV/RemoteFX have come together very nicely in 2012. The incremental improvements over the last 4 or so years to RDP, Hyper-V, and RemoteFX have made a great platform for cost effective VDI. This article will outline setting this entire environment up on one Server 2012 Datacenter box, but this could be scaled to as many machines as you need. (Add VMM for management in a large deployment) In this article I'll be walking through a basic setup of a Hyper-V Virtualization Host, Connection Broker, Web Access, a pool, the whole 9.

Assumptions:
  • You have at least one 2012 Hyper-V host setup.
  • You've got at least one 2012 server ready to go as the other roles. This can be a VM. 
  • You've got a sangwich. You'll need one, this is a bit of a lengthy install. 
Starting in seemingly reverse order will make this while thing easier; you'll see why.

Create an Template/Image to use For VDI

BTW, more template info here.
  1. Create a Virtual Desktop template by making a new VM with (generally) default settings. Insert the ISO and install the OS and make sure your product key is applicable to be in a your target VDI environment  (i.e. MAK with a SA or KMS as applicable) 
  2. After installing the OS, execute sysprep or something similar. On windows 8, that will be located under %SystemRoot%\system32\sysprep\sysprep.exe. Make sure you generalize and restore to OOB Experience; select shutdown when complete. 

Install Remote Desktop Services Components

  1. Prior to starting the RDS installation, you need to add all servers involved in your deployment to server manager to enable them as options during deployment. To do so, click "Add Servers To Manage" from the start screen of server manager and add any servers that will be part of the setup. (Hyper-V host, RDS Connection Broker, Session Host, etc.) 
  2. After adding the server(s) in question, start the RDS deployment by clicking "Manage->Add Roles and Features" from within server manager. 
  3. Proceed to the "Installation Type" and select "Remote Desktop Services installation" and click "Next".  
  4. On "Deployment Type" select "Standard deployment" and click "Next". Unless you've been through this before, I don't recommend Quick Start as it skips some things you should know. 
  5. On "Deployment Scenario" we'll be going through "Virtual machine-based desktop deployment". Select it and click "Next". Note that both options here have their uses, we're just covering VDI because it's a newer option. For more information on the differences, see this blog post by Yung Chou. 
  6. Based on our choices, it should notify you that RD Connection Broker, RD Web Access, and RD Virtualization Host will be installed. Review and click "Next". 
  7. You will be prompted to select a machine from your pool to host the RD Connection Broker role. Select the host(s) you would like for this role, move them to the right plane, and then click "Next". The Connection Broker distributes load across multiple hosts (if applicable) and maintains session information to ensure users are directed to the proper session or virtual desktop. For more information, see this TechNet article. This role can be hosted by a virtual machine. 
  8. Now you'll be prompted to select the RD Web Access server. In smaller deployments it is very common to place this on the same server as the RD Connection Broker. In larger environments you'll need to take external connection needs and security into account. Either click "Install the RD Web Access role service on the RD Connection Broker server" or select the server(s) you do want and click "Next". This role can also be hosted by a virtual machine. 
  9. Time to select virtualization host(s). This role cannot be hosted by a virtual machine for obvious reasons. Select the machne(s), move them over, and click "Next". 
  10. You'll be presented with the confirmation screen; review the information and click "Deploy" to create the whole setup. 
  11. The progress of each role installation will be displayed; do not be suprised if this takes some time. 

Setup a VDI Collection

  1. In server manager, click "Remote Desktop Services" and then click "3> Create Virtual Desktop Collections
  2. Click "Next" to bypass the before you begin section and then give your collection an appropriate name and click "Next" again. 
  3. Select the type of collection you want, Pooled virtual desktops or Personal virtual desktops. There is a lot that goes into this decision, but as a rule of thumb you can think of it like this: Pooled virtual desktops = many (users) to one relationship and Personal virtual desktops=one to one relationship. For my lab I'll be doing Personal virtual desktops, so please note that the options listed after this may be slightly different should you want Pooled. Unless you know you want otherwise leave "Automatically create and manage virtual desktops" checked and click "Next".
  4. When prompted with "Virtual Desktop Template" select the template we created in the first step and click "Next". 
  5. (This step unnecessary for pooled desktops) In most cases, you'll want to leave "Enable automatic user assignment" selected because that will give the requesting user access to a newly provisioned VD. If you desire, select "Add the user account to the local administrators group on the virtual desktop" and click "Next". 
  6. For "Virtual Desktop Settings" you should provide your Sysprep answer file; this will contain all the provisioning settings for your company. Since this is a lab setup in my case, I'll be selecting "Provide unattended installation settings". Click "Next".
  7. You need to know where you want to place automatically created VDI objects in Active Directory. After making that determination you'll need to paste in the path to the OU. Then, we'll need to generate a powershell script and execute it on a machine that has the Active Directory management tools installed on it. First things first, navigate to a machine with the Active Directory management tools installed and logon as an account with appropriate domain privs. On that machine:
  8. Open Active Directory Administrative Center and navigate to where you would like the VDI machines go to; create the OU if necessary and double click to go into it. Select the navigation plane (next to the arrow keys on the top) and it will give the DN. Copy and paste this DN to specify in setup. 
  9. Switch back to the RDS server. Set the time zone and then select "Specify the distinguished name of the organizational unit" and paste in our DN from the other server; DO NOT click Next yet. 
  10. After pasting the DN in, click the "Generate script" at the bottom of the window and copy all the contents of the script.
  11. Switch back to the AD server and open notepad. Copy the script into notepad and save it to a temporary location, i.e. C:\temp\Grant-RDSRights.ps1.
  12. (Still on AD server) Open Powershell as an administrator. If needed, execute "Set-ExecutionPolicy unrestricted" to allow script execution. 
  13. (Still on AD server) Execute the script you just saved. If your rights are correct you will get a success message. 
  14. Switch back to the RDS server and click "Next". If it doesn't work you may need to wait for the permissions to replicate. BUG WARNING: Ensure you do not have any "." characters in your DN. (I.E. in you OU names) If you do, this will not work. You will get the message "The RD Connection Broker server does not have access to add the virtual desktops to the Active Directory domain. Configure access by using the Active Directory page of Deployment Properties." despite the fact that permissions are in fact correct. (I wish I could bill someone for time wasted figuring that out) 
  15. Select the Active Directory Group, # of initial virtual desktops, the machine prefix, and the machine suffix. I recommend making one AD group per collection to accurately track who has access to what. As for a machine prefix/suffix, pick something that will work for your organization. I use VDI- for a prefix. Click "Next". 
  16. The "Virtual Desktop Allocation" screen will come up and allow you to distribute your VDI machines across multiple hosts if desired. Distribute accordingly and click "Next". 
  17. For "Virtual Desktop Storage" select what type of storage you would like to utilize for these VDI machines. You have all your standard options here, including Cluster Shared Volumes. For more on CSVs, check this out. Select your desired disk location and hit "Next". 
  18. The confirmation screen will come up; use this to review your settings and click "Create". 
  19. This may take awhile depending on your disk configuration and it may even report to the window that it's not responding. Don't worry, it'll complete eventually. 
That does it! You've now got your stable of virtual machines ready to dole out to deserving employees. If you're particularly astute you will be able to convince management that there is a monthly cost for each desktop payable to your bank account.

Managing Your Collection

Adding a Desktop

  1. Open Server Manager either on the RDS server or a machine with that server registered in its server manager. 
  2. Click "Remote Desktop Services"
  3. Under "Collections", click your collection name. 
  4. Under "Virtual Desktops" on the right, click "Tasks->Add Virtual Desktop"
  5. Specify how many virtual desktops you would like to add. 
  6. Specify on which server you would like to add them.
  7. Click "Create"
  8. You will be notified when the creation request is complete. 

Assigning a Desktop

  1. Open Server Manager either on the RDS server or a machine with that server registered in its server manager. 
  2. Click "Remote Desktop Services"
  3. Under "Collections", click your collection name. 
  4. Right click on the VDI machine you would to assign and select "Assign Virtual Desktop". 
  5. Specify a user to assign to and click "Assign". Note this user must be in the group you specified as the user group for this collection above. 

Configuring Licensing


This is a topic for a whole other article, but for now have a look a this Technet article and this one as well. 

Accessing Your Collection

There is enough here for another article, but to get you started: 

  1. Using IE (preferably) navigate to https://your.rdweb.server/RDWeb 
  2. You'll probably get a cert warning; you can fix that later by installing the proper web cert on your IIS server. 
  3. Log in with your assigned user and double click on the collection you created. 
  4. Enjoy your fresh install of Dos 5.0. (I'm assuming that's what you are using) 
Next up, RemoteFX. Update: RemoteFX Article here.