Wednesday, February 27, 2013

Azure IaaS (VM) Tip: Use Skydrive to Transfer Files Quickly

While working with Azure hosted VMs, I wanted an easy and secure solution to do one-off file transfers without opening too much up. I found that the web interface for Skydrive works perfectly! Here's a quick howto:

Assumptions:

  • You have an Azure VM you want to get files to. 
  • You have a skydrive account. 

Let's go:

  1. Throw your desired files into a folder in your skydrive. 


  2. Log into your Azure VM via RDP and and click "Configure this local server" in Server Manager


  3. Click "IE Enhanced Security Configuration" 
  4. Set it to "Off" Administrators. (Be careful after this; don't be browsing the web on this thing..) 


  5. Open IE, navigate to skydrive.live.com and login. 
  6. Navigate to the folder you want to copy to the VM; do not drill into it. Hover your mouse over it and check the box in the upper right. 


  7. Click "Download" to download a zip file of the folder structure to the VM! (cool that skydrive makes the zip on the fly) 
Enjoy!

Sunday, February 24, 2013

Experiment: Application Server on Windows Azure IaaS 90 Day Trial

Windows Azure now allows you to demo the IaaS (Infrastructure as a Service) model with a 90 day free trial. This is a welcome change and I thought I'd walk through the setup of something fun as an experiment: A mumble (murmur) server setup. Mumble is an open source voice chat platform that focuses on low latency and high voice quality. It's primary focus is for use when gaming, but my family uses it from time and time to "call" distant places because the low latency makes long distance chat less awkward. That said, this obviously applies to your app of choice, which is what makes this such a powerful option.

IaaS allows you to host full virtual machines in the Azure cloud. (Among other things) Pre-configured options currently include Windows (2012, 2008r2) and Linux. (CentOS, Ubuntu, Suse)

VM Management Dashboard


In this article, I'll walk you through signing up for Windows Azure, provisioning a basic 2012 server, and installing and configuring a serving platform.

Sign up


Navigate to http://www.windowsazure.com/en-us/pricing/free-trial/ and click "Try it now". You'll need to logon with your Microsoft (Live/Passport/etc.) and enter your credit card information to start an account. Note that after the 90 days you will need to cancel the account or you will be billed for anything you have setup.

Setup


After account setup you should be able to immediately log into the 
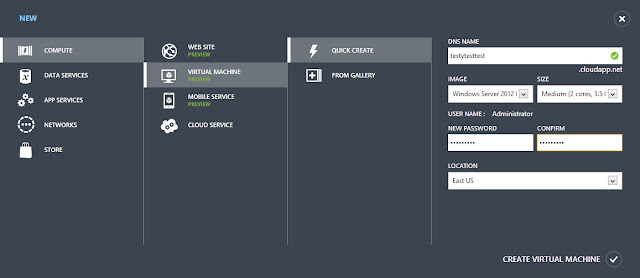
Azure management portal. After logging in (and browsing around; they've really done a nice job on this) click "New" in the bottom lefthand corner. To create the 2012 instance, select "Compute->Virtual Machine->Quick Create". You will then need to populate the following fields:
  • DNS Name: This is both the name of the machine and where it will be accessible on the internet. The cloudapp.net suffix will be added on the end of the name. Say, for example, you name it "megawidgetgenerator01". In that case you can find it on the internet by resolving "megawidgetgenerator01.cloudapp.net". Your name will need to be unique among other machines in that DNS zone. (see the green checkbox)
  • Image: What you want the VM to be. I'll be selecting "Windows Server 2012 Datacenter"
  • Size: This select how many cpus and how much memory you would like. After the trial (and perhaps during depending on usage) you will be charged relative to your resource utilization. "Larger" machines cost more per month. I'll be going with "Medium" for my test, which gives me 2 dedicated cores and 3.5GB of RAM. The processors used (as of the writing of this article) are the AMD Opteron 4171 HE, not a stellar performer but excellent in the cores-per-watt department which makes it a smart choice.
  • UserName: Fixed at this time to "Administrator" 
  • Password: for the admin account. Pick something good; this is accessible from anywhere. 
  • Location: Which datacenter do you want it in? Pick the geo closest to your users. 


After filling that out, click "Create Virtual Machine".  Your new VM will be provisioned within a few minutes. You can now connect to your new server by navigating in the Azure management portal to Virtual Machines->Select your new VM-> Connect (on the bottom). This will send you a .rdp file to connect via RDP, but know you can just connect to the hostname you selected at any time; RDP is automatically enabled and unblocked by the default image.


Configuration


After connecting, you probably want to run Windows Update to ensure everything is patched up. After that, do the following:

  • Install your application. (Mumble in my case) 
  • Unblock the ports in Windows Firewall
  • Set the ports up as Endpoints in Azure EDIT: See my article here.

Windows Azure defeats the IPv4 exhaustion issue by NATing VMs. (boy IPv6 will be nice) Because of this, you need to setup enpoints in Azure so they can update their NAT rules to forward ports on the public IP (visible when you click your VM and look under "quick glance") to the private IP associated with your machine. The current limit for endpoints is 150 ports.  This should be more than enough for most applications. To accomplish this: refer to the following:

Overall I'm impressed. I'm very excited to work with Azure in the future. With these capabilities, I feel I've always got another datacenter on tap for any of my clients I can use for load balancing, DR, or as a primary site for whatever they may need.

Friday, February 15, 2013

Server 2012 Hyper-V + RDP + RemoteFX = a Delicious "Sangwich" of Cheap VDI

Oh man. Microsoft has done well on this; VDI/RDP/HyperV/RemoteFX have come together very nicely in 2012. The incremental improvements over the last 4 or so years to RDP, Hyper-V, and RemoteFX have made a great platform for cost effective VDI. This article will outline setting this entire environment up on one Server 2012 Datacenter box, but this could be scaled to as many machines as you need. (Add VMM for management in a large deployment) In this article I'll be walking through a basic setup of a Hyper-V Virtualization Host, Connection Broker, Web Access, a pool, the whole 9.

Assumptions:
  • You have at least one 2012 Hyper-V host setup.
  • You've got at least one 2012 server ready to go as the other roles. This can be a VM. 
  • You've got a sangwich. You'll need one, this is a bit of a lengthy install. 
Starting in seemingly reverse order will make this while thing easier; you'll see why.

Create an Template/Image to use For VDI

BTW, more template info here.
  1. Create a Virtual Desktop template by making a new VM with (generally) default settings. Insert the ISO and install the OS and make sure your product key is applicable to be in a your target VDI environment  (i.e. MAK with a SA or KMS as applicable) 
  2. After installing the OS, execute sysprep or something similar. On windows 8, that will be located under %SystemRoot%\system32\sysprep\sysprep.exe. Make sure you generalize and restore to OOB Experience; select shutdown when complete. 

Install Remote Desktop Services Components

  1. Prior to starting the RDS installation, you need to add all servers involved in your deployment to server manager to enable them as options during deployment. To do so, click "Add Servers To Manage" from the start screen of server manager and add any servers that will be part of the setup. (Hyper-V host, RDS Connection Broker, Session Host, etc.) 
  2. After adding the server(s) in question, start the RDS deployment by clicking "Manage->Add Roles and Features" from within server manager. 
  3. Proceed to the "Installation Type" and select "Remote Desktop Services installation" and click "Next".  
  4. On "Deployment Type" select "Standard deployment" and click "Next". Unless you've been through this before, I don't recommend Quick Start as it skips some things you should know. 
  5. On "Deployment Scenario" we'll be going through "Virtual machine-based desktop deployment". Select it and click "Next". Note that both options here have their uses, we're just covering VDI because it's a newer option. For more information on the differences, see this blog post by Yung Chou. 
  6. Based on our choices, it should notify you that RD Connection Broker, RD Web Access, and RD Virtualization Host will be installed. Review and click "Next". 
  7. You will be prompted to select a machine from your pool to host the RD Connection Broker role. Select the host(s) you would like for this role, move them to the right plane, and then click "Next". The Connection Broker distributes load across multiple hosts (if applicable) and maintains session information to ensure users are directed to the proper session or virtual desktop. For more information, see this TechNet article. This role can be hosted by a virtual machine. 
  8. Now you'll be prompted to select the RD Web Access server. In smaller deployments it is very common to place this on the same server as the RD Connection Broker. In larger environments you'll need to take external connection needs and security into account. Either click "Install the RD Web Access role service on the RD Connection Broker server" or select the server(s) you do want and click "Next". This role can also be hosted by a virtual machine. 
  9. Time to select virtualization host(s). This role cannot be hosted by a virtual machine for obvious reasons. Select the machne(s), move them over, and click "Next". 
  10. You'll be presented with the confirmation screen; review the information and click "Deploy" to create the whole setup. 
  11. The progress of each role installation will be displayed; do not be suprised if this takes some time. 

Setup a VDI Collection

  1. In server manager, click "Remote Desktop Services" and then click "3> Create Virtual Desktop Collections
  2. Click "Next" to bypass the before you begin section and then give your collection an appropriate name and click "Next" again. 
  3. Select the type of collection you want, Pooled virtual desktops or Personal virtual desktops. There is a lot that goes into this decision, but as a rule of thumb you can think of it like this: Pooled virtual desktops = many (users) to one relationship and Personal virtual desktops=one to one relationship. For my lab I'll be doing Personal virtual desktops, so please note that the options listed after this may be slightly different should you want Pooled. Unless you know you want otherwise leave "Automatically create and manage virtual desktops" checked and click "Next".
  4. When prompted with "Virtual Desktop Template" select the template we created in the first step and click "Next". 
  5. (This step unnecessary for pooled desktops) In most cases, you'll want to leave "Enable automatic user assignment" selected because that will give the requesting user access to a newly provisioned VD. If you desire, select "Add the user account to the local administrators group on the virtual desktop" and click "Next". 
  6. For "Virtual Desktop Settings" you should provide your Sysprep answer file; this will contain all the provisioning settings for your company. Since this is a lab setup in my case, I'll be selecting "Provide unattended installation settings". Click "Next".
  7. You need to know where you want to place automatically created VDI objects in Active Directory. After making that determination you'll need to paste in the path to the OU. Then, we'll need to generate a powershell script and execute it on a machine that has the Active Directory management tools installed on it. First things first, navigate to a machine with the Active Directory management tools installed and logon as an account with appropriate domain privs. On that machine:
  8. Open Active Directory Administrative Center and navigate to where you would like the VDI machines go to; create the OU if necessary and double click to go into it. Select the navigation plane (next to the arrow keys on the top) and it will give the DN. Copy and paste this DN to specify in setup. 
  9. Switch back to the RDS server. Set the time zone and then select "Specify the distinguished name of the organizational unit" and paste in our DN from the other server; DO NOT click Next yet. 
  10. After pasting the DN in, click the "Generate script" at the bottom of the window and copy all the contents of the script.
  11. Switch back to the AD server and open notepad. Copy the script into notepad and save it to a temporary location, i.e. C:\temp\Grant-RDSRights.ps1.
  12. (Still on AD server) Open Powershell as an administrator. If needed, execute "Set-ExecutionPolicy unrestricted" to allow script execution. 
  13. (Still on AD server) Execute the script you just saved. If your rights are correct you will get a success message. 
  14. Switch back to the RDS server and click "Next". If it doesn't work you may need to wait for the permissions to replicate. BUG WARNING: Ensure you do not have any "." characters in your DN. (I.E. in you OU names) If you do, this will not work. You will get the message "The RD Connection Broker server does not have access to add the virtual desktops to the Active Directory domain. Configure access by using the Active Directory page of Deployment Properties." despite the fact that permissions are in fact correct. (I wish I could bill someone for time wasted figuring that out) 
  15. Select the Active Directory Group, # of initial virtual desktops, the machine prefix, and the machine suffix. I recommend making one AD group per collection to accurately track who has access to what. As for a machine prefix/suffix, pick something that will work for your organization. I use VDI- for a prefix. Click "Next". 
  16. The "Virtual Desktop Allocation" screen will come up and allow you to distribute your VDI machines across multiple hosts if desired. Distribute accordingly and click "Next". 
  17. For "Virtual Desktop Storage" select what type of storage you would like to utilize for these VDI machines. You have all your standard options here, including Cluster Shared Volumes. For more on CSVs, check this out. Select your desired disk location and hit "Next". 
  18. The confirmation screen will come up; use this to review your settings and click "Create". 
  19. This may take awhile depending on your disk configuration and it may even report to the window that it's not responding. Don't worry, it'll complete eventually. 
That does it! You've now got your stable of virtual machines ready to dole out to deserving employees. If you're particularly astute you will be able to convince management that there is a monthly cost for each desktop payable to your bank account.

Managing Your Collection

Adding a Desktop

  1. Open Server Manager either on the RDS server or a machine with that server registered in its server manager. 
  2. Click "Remote Desktop Services"
  3. Under "Collections", click your collection name. 
  4. Under "Virtual Desktops" on the right, click "Tasks->Add Virtual Desktop"
  5. Specify how many virtual desktops you would like to add. 
  6. Specify on which server you would like to add them.
  7. Click "Create"
  8. You will be notified when the creation request is complete. 

Assigning a Desktop

  1. Open Server Manager either on the RDS server or a machine with that server registered in its server manager. 
  2. Click "Remote Desktop Services"
  3. Under "Collections", click your collection name. 
  4. Right click on the VDI machine you would to assign and select "Assign Virtual Desktop". 
  5. Specify a user to assign to and click "Assign". Note this user must be in the group you specified as the user group for this collection above. 

Configuring Licensing


This is a topic for a whole other article, but for now have a look a this Technet article and this one as well. 

Accessing Your Collection

There is enough here for another article, but to get you started: 

  1. Using IE (preferably) navigate to https://your.rdweb.server/RDWeb 
  2. You'll probably get a cert warning; you can fix that later by installing the proper web cert on your IIS server. 
  3. Log in with your assigned user and double click on the collection you created. 
  4. Enjoy your fresh install of Dos 5.0. (I'm assuming that's what you are using) 
Next up, RemoteFX. Update: RemoteFX Article here.

Monday, February 4, 2013

Installing nVidia Consumer Drivers on Server 2012 Core for RemoteFX


I'm wanting to establish Microsoft RemoteFX in my lab, and to do so, one needs a dedicated 3d accelerator. Obviously, nVidia didn't make the drivers with Server 2012 (now 2016 as well, see below) Core in mind. To accomplish this, we need do the following:

1> Download the newest drivers from nVidia. (Note the later half of these points will probably work on ATI cards as well, you just need to unpack the drivers)
2> Execute the driver setup directly on core server the and select a temporary directory. 
3> Hit "OK"; the installer will crash because it's uncomfortable in the lovely world of server core.
4> Navigate to the display.driver directory underneath the extracted files in the temporary directory you selected earlier. You should find the .inf files in this directory. For nVidia it is nv_disp.if. Update 5/3/2015: the .inf file is now nv_dispi.inf, thanks bearkiter.
5> From cmd.exe, execute "pnputil -i -a nv_disp.inf"
6> The screen will blank! Don't be afraid. After completion, you should see a screen that looks like the shot below. (yes the borders are gone)
7> Assuming it's OK to do so execute "Shutdown /r /t 0" to reboot the machine.

I'm working on another article to cover VDI/RemoteFX. Stay tuned. Update: Article here.


Update 2/3/2017: Confirmed working on Windows 2016! Consumer grade hardware works in the lab as well.